
Some dishes are close to our heart and has lot of memories attached to it. This is one such dish for me and my sister and now our spouses too. I have no idea from where my mom has got this recipe but this is one such recipe which is special, and will always be relished hopefully through generations.
This Indian meatball curry is savory, slightly spicy and packed with flavor. You can use any ground meat to make this – I personally prefer beef or lamb for making this kofta curry. Whatever type of meat you choose – know that it’ll be minced in a food processor, resulting in a truly melt-in-your-mouth Indian
spiced meatballs simmered in a fragrant and flavorful gravy.
This recipe has two parts.(Do not fret, thinking its gonna be difficult). First is mincing the meat & making them into small meatballs. Second part is making the gravy in which these meatballs will swim.😬
Let's see how it's done. Step by step images uploaded for easy reference.
Also this is a make ahead recipe. Its perfect to make one or two days in advance as it definitely enhances the flavour as with any other meat dishes. So it's perfect for parties. I always make these a day in advance and store them in fridge.
Recipe Courtesy : My mom
Make sure to check out NOTES below before you start the recipe to get insightful tips for this recipe
Ingredients for meatballs :- 1kg meat (Beef/lamb/chicken)
- 1 egg
- 2 Tbsp Besan/Chickpea flour
- One onion finely chopped
- Green chillies 6 to 7 or as per taste
- 1 inch piece ginger
- Salt to taste
- One food processor or mixer jar for mincing
- Oil to deep fry
- First cut the meat pieces to bite size. Make sure to remove all the waste (fat). **
- Most important is that there should be minimum fat or no fat at all in the meat after cleaning
- Wash well and drain the water completely. (See Pro Tip Below)
- Now refrigerate the cleaned and drained meat for half an hour atleast in fridge (Remember Fridge)
- During this time cut all the other ingredients mentioned above into small pieces and keep aside
- After 30 mins, take out the meat from the fridge and we need to mince these
- For mincing- (grind in small batches) - In to a mixer jar (grinding blade) or a food processor add in few pieces of meat along with egg, besan (chickpea flour), onion, green chillies, ginger & some salt and mince this mix. Keep aside
- Now add in rest of the meat in batches & mince them as well. Add little by little (not more than half of mixer jar) or else the meat won't mince well.
- Once all the meat is minced, use your hands to mix everything well and make sure all the other ingredients (first batch mince) is combined with the other mince batch
- Then make these into small balls. I prefer these to be a gooseberry (nellikka) size and deep fry. (Again these should be in batches) Keep these aside.
Now for the Gravy part. Ingredients are listed below:
Ingredients for gravy :
- Three onions finely chopped
- Three big tomatoes (blanched & pureed)
- 5 to 6 garlic pods finely chopped
- 1 inch piece ginger finely chopped
- 2 tsp Chilli powder (I use Kashmiri chili powder for colour)
- 1/2 tsp Turmeric powder
- 1/2 tsp Garam masala powder (optional)
- Salt to taste
- Oil
- Coriander leaves for garnishing
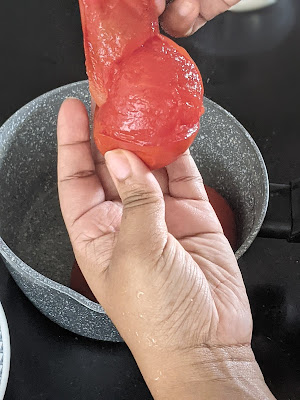
- Wash the tomatoes nicely and boil them in water for 5 to 10 mins. Make sure to make a slit on top of each tomato for easy removal of the skin later. (See Pics below)
- Remove the skin, cool and make puree in mixer & keep aside.
- Now add oil into a kadai/pan & to it add the finely chopped onions along with the chopped ginger and garlic.
- Saute this for about 10 mins on medium flame or till it's translucent.
- Then add turmeric powder, chilli and garam masala powder (if using) to it.
- Fry these for another 2-3 mins till the raw smell of the masala goes away.
- Now to this add in the tomato puree which was kept aside and saute for 5 mins.
- Season it with salt and add enough water to this & let it boil well.
- Once water starts boiling, carefully add in the prepared fried meat-balls to it
- Allow it to boil for another 5 mins on high flame.
- Then lower the flame (lowest) and cook these for about 45 min. Make sure to have enough water so that the meat balls are almost drowned in it.
- Check for seasoning at this stage and add salt if needed.
- In between if u feel water is less, then just add hot water to it n keep for 45 mins on low flame.
- After 45 mins, switch off the flame and garnish with chopped coriander leaves.
This recipe is perfect as a make ahead dish as all the flavours really come out after few hours of cooking
Pro Tip : I add a handful of coriander leaves as this gives it a nice flavour. Also if you are not serving at the same time, garnish with coriander just before serving.
Notes:
- Make sure the meat doesn't have any fat or should be with minimal fat. Or else the meatballs will not be able to hold shape & will open up while frying
- You can use store bought minced meat as well to make these balls, but I personally would not recommend as I feel the texture changes
- Make sure to wash & drain the water well from the meat before mincing. Keeping the meat in fridge for 30 mins makes it easier to mince
- As mentioned above you can make the mince after cooking the meat as well if you don't wanna do with raw meat
- Same recipe can be used with chicken mince as well
- TIP: Make few meatballs & start frying them. While one batch is frying you can make the rest of the balls simultaneously.
- As mentioned earlier this is a make ahead recipe and also freezes well. I always make these a day in advance & store them. Just before consuming I reheat them again in a pan. Make sure if you are not consuming right away avoid the coriander. Add fresh coriander the day you gonna consume it. Make sure enough water is there for the gravy & the meatballs should be almost drowned in them. It is kept on low flame for 45 mins, so make sure you don't burn it
You can have these with roti/chapati or any rice dish. You really need to try it once to see why we love this one.
If this is a recipe which you loved, please go ahead and share with friends & family. If you happen to make this recipe, do share pictures and tag me on my insta handle - #lynnskitchenjournal


Looks soo good . Will try this out
ReplyDeleteThey are amazing chechi. Mom's Signature dish :)
DeleteYou are an amazing cook, mom, wife, daughter, sister and BF
ReplyDeleteThat's very kind of you. Thank you so much
DeleteAmayi rate them on a scale of 1-10
ReplyDelete10 on 10 Avnu
Delete